AI Clearance — Complete Operations Guide
AI Clearance governs AI tool access in Jira Service Management (JSM): approved tool catalog, one-user timeboxed access requests, grant lifecycle, configured-group membership evidence, recertification, and audit evidence. This page is intentionally exhaustive and mapped to the app’s current customer-facing behavior.
Quick Start / After Install
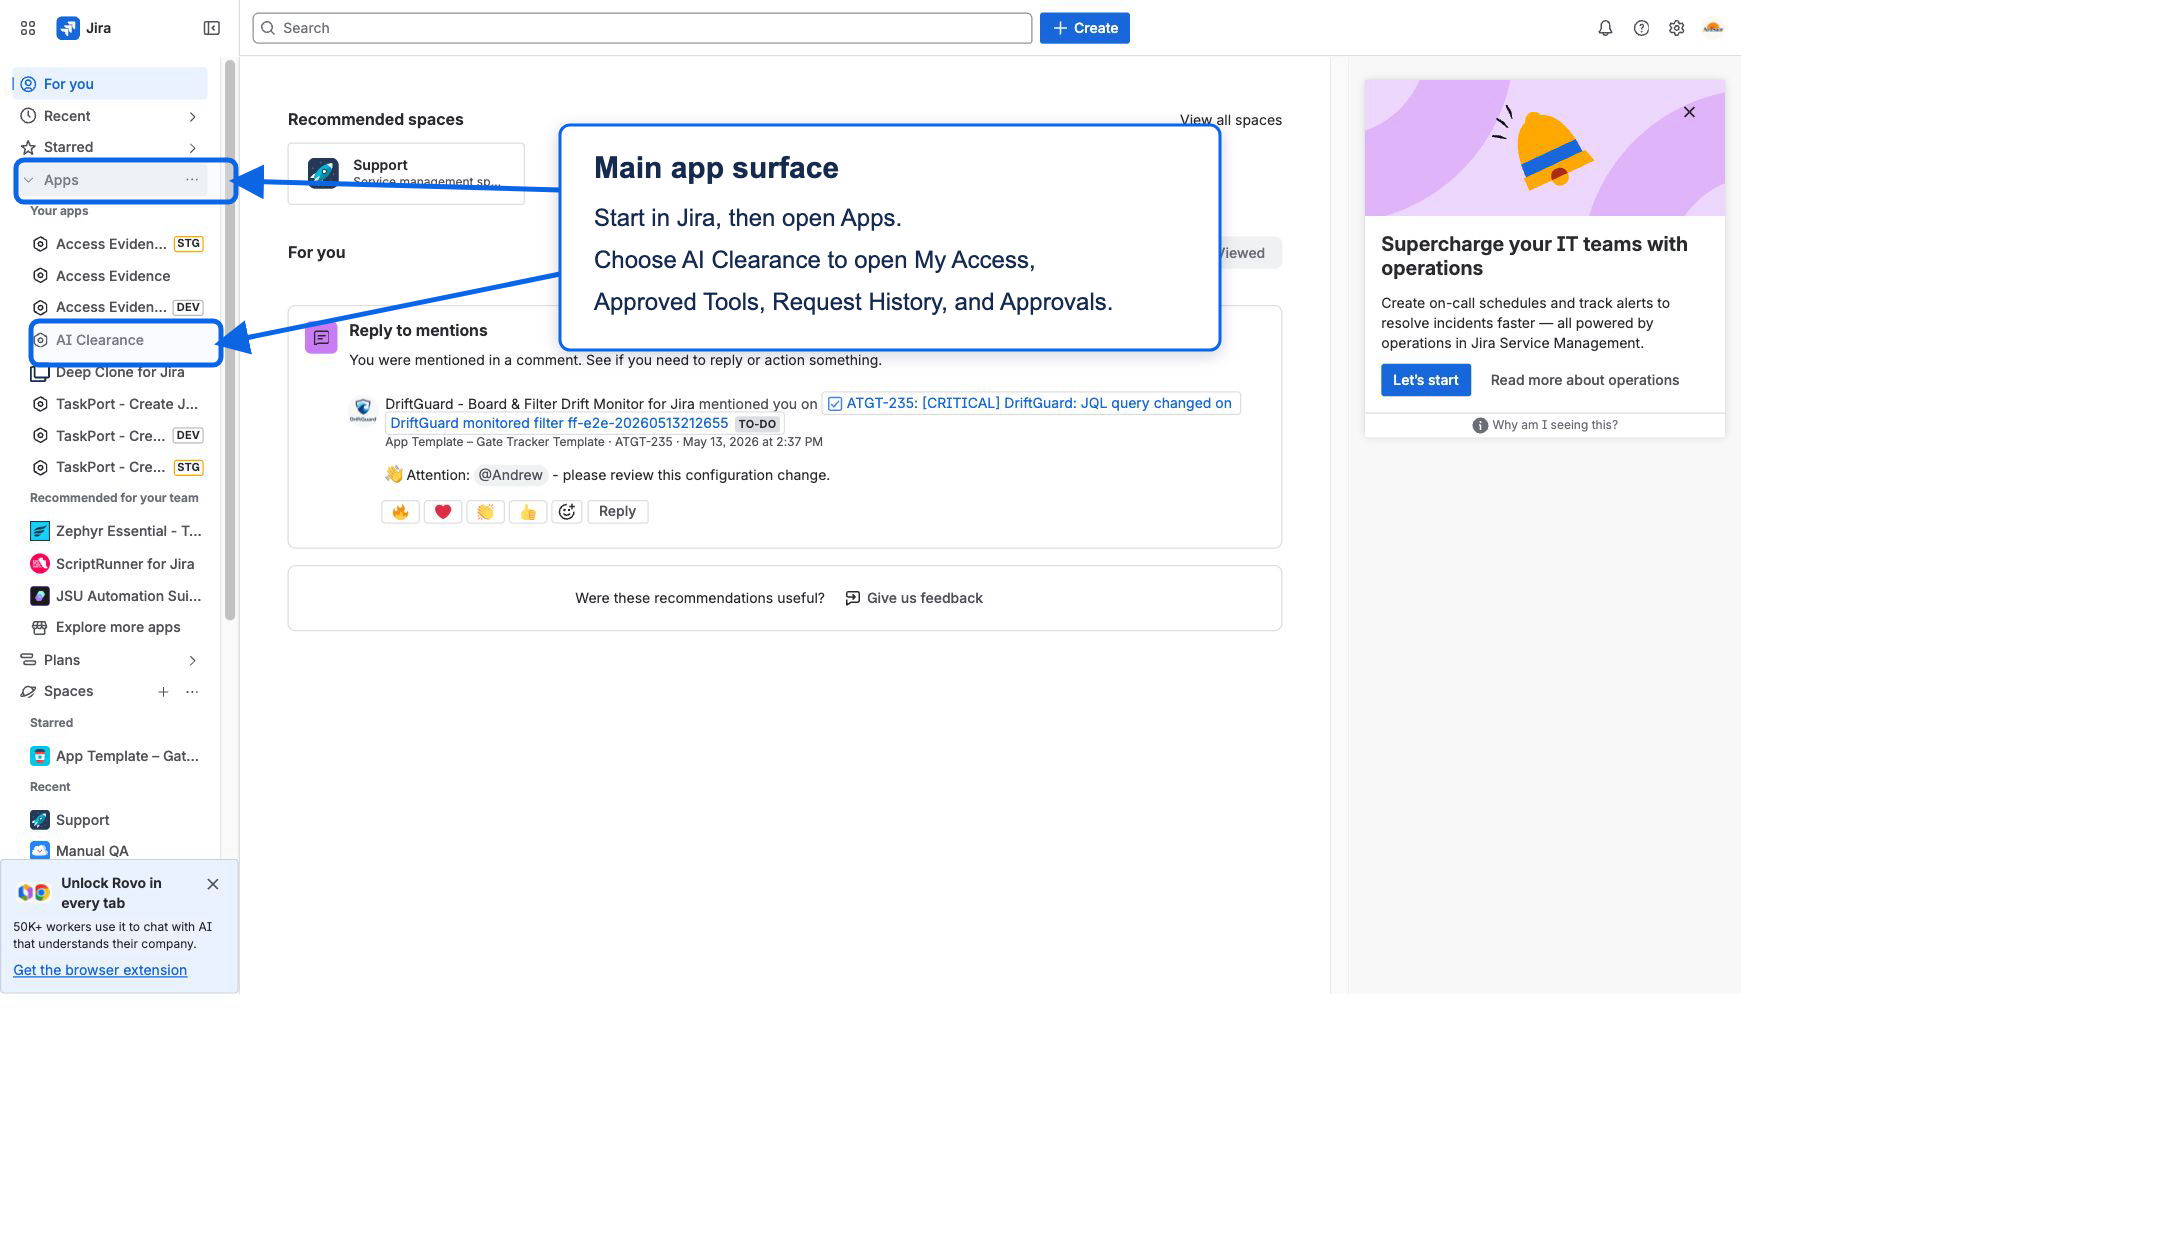
Start in the Jira product, not Atlassian Administration. Open https://<site>.atlassian.net/jira. AI Clearance has a main app surface for users and approvers, and a separate admin/setup surface for Jira admins.
Surface map
- Main app surface: My Access, Approved Tools, Request History, and Approvals. Reach it from Jira left sidebar → Apps → AI Clearance.
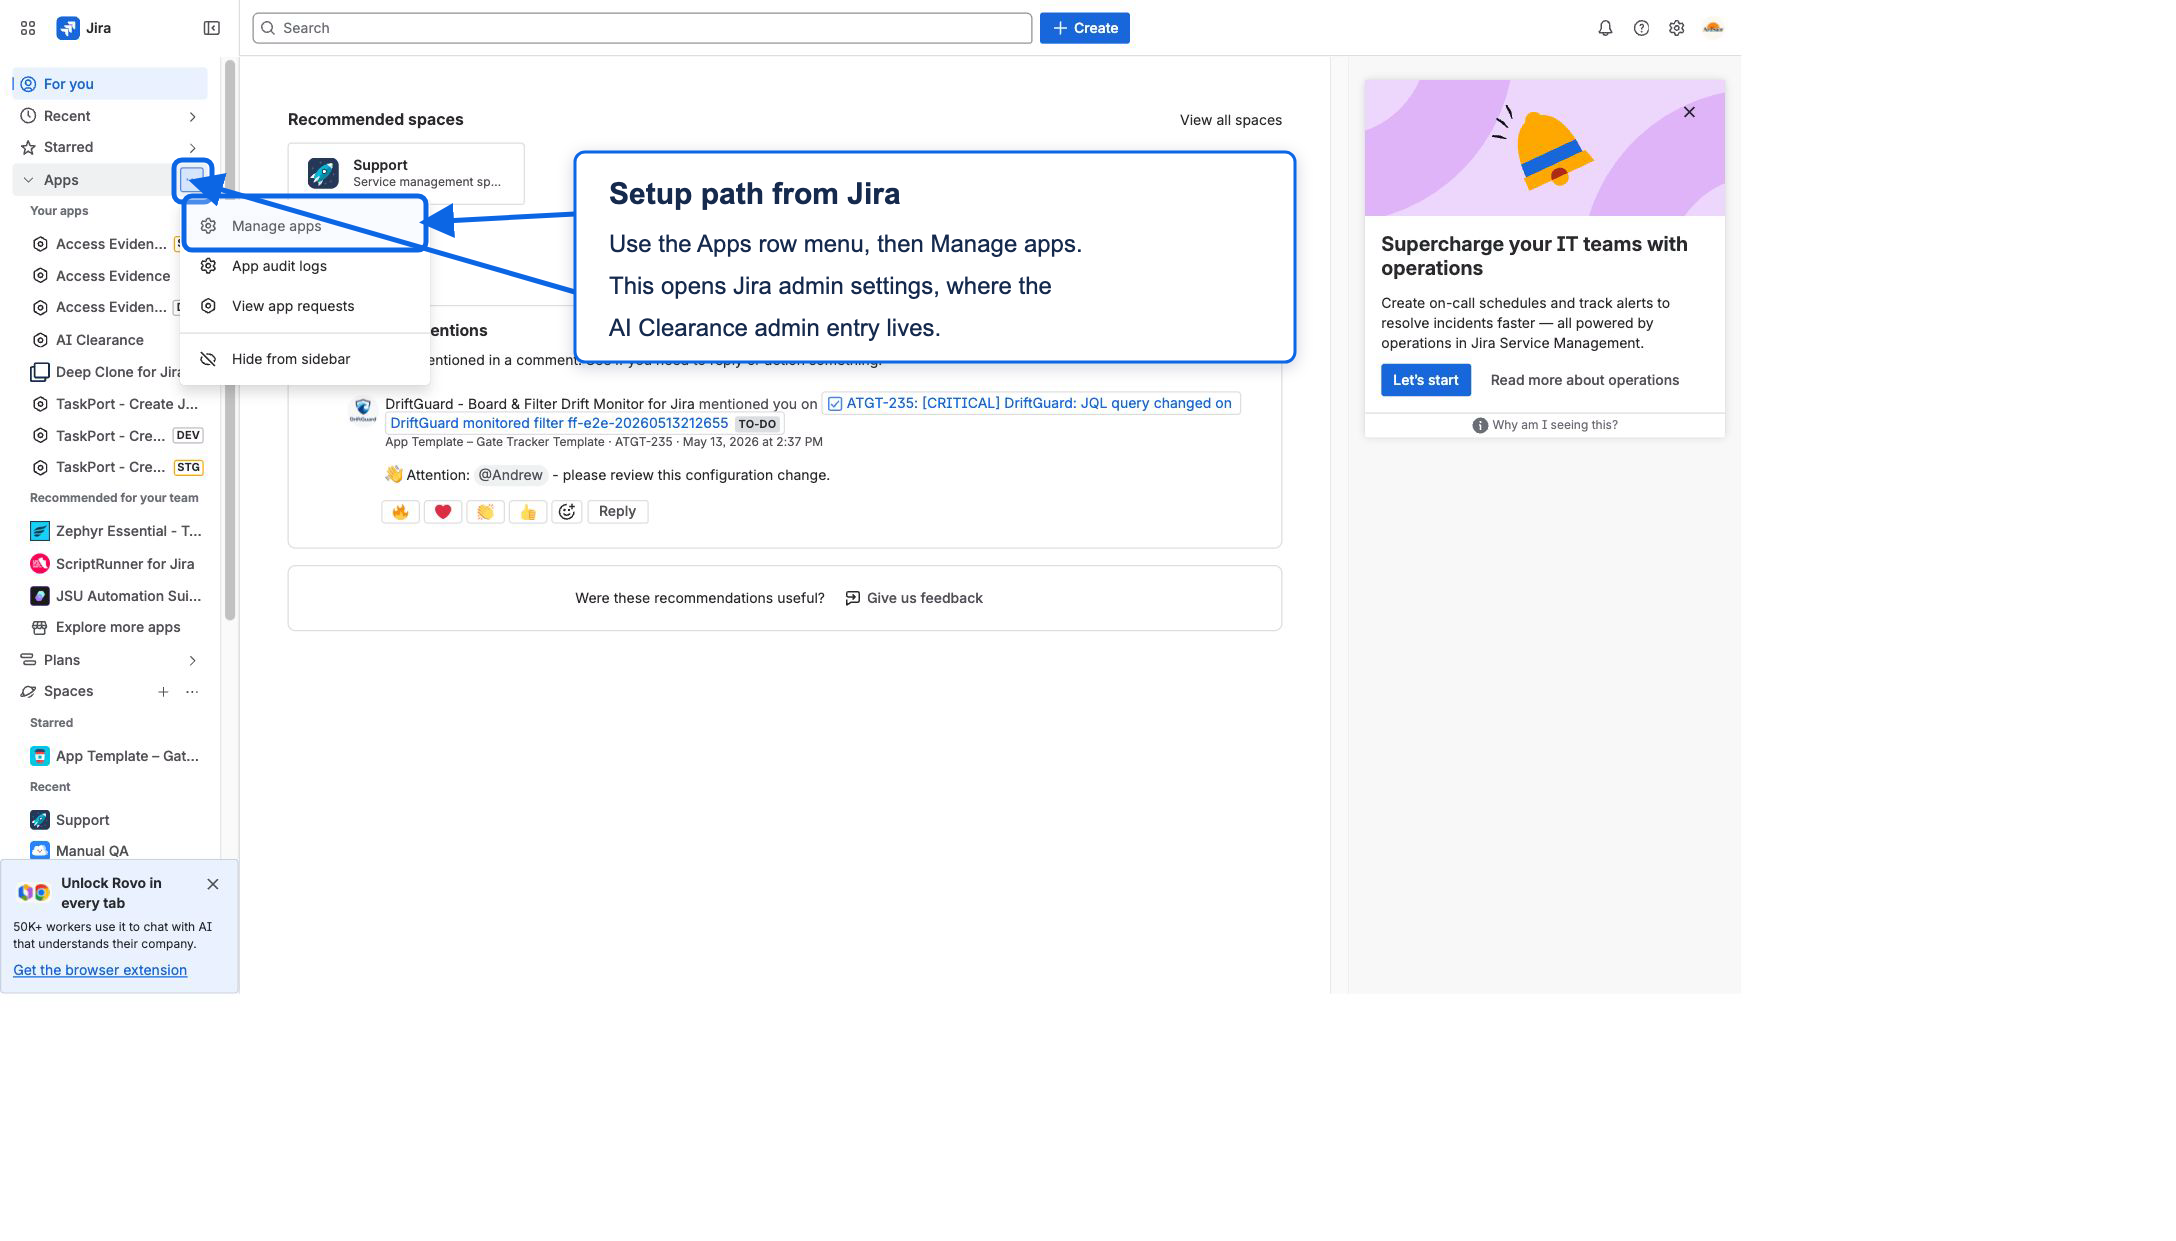
- Admin/setup surface: Intake & Approvals, Catalog, Connectors, Governance, Requests, Insights, and Governance Logs. Reach it from Jira left sidebar → Apps menu (...) → Manage apps → Jira admin settings → Apps → AI Clearance.
Five-minute path
- Open
https://<site>.atlassian.net/jira. - In the Jira left sidebar, expand Apps.
- Click AI Clearance to confirm the main app surface opens.
- Return to Jira, open the Apps row menu (
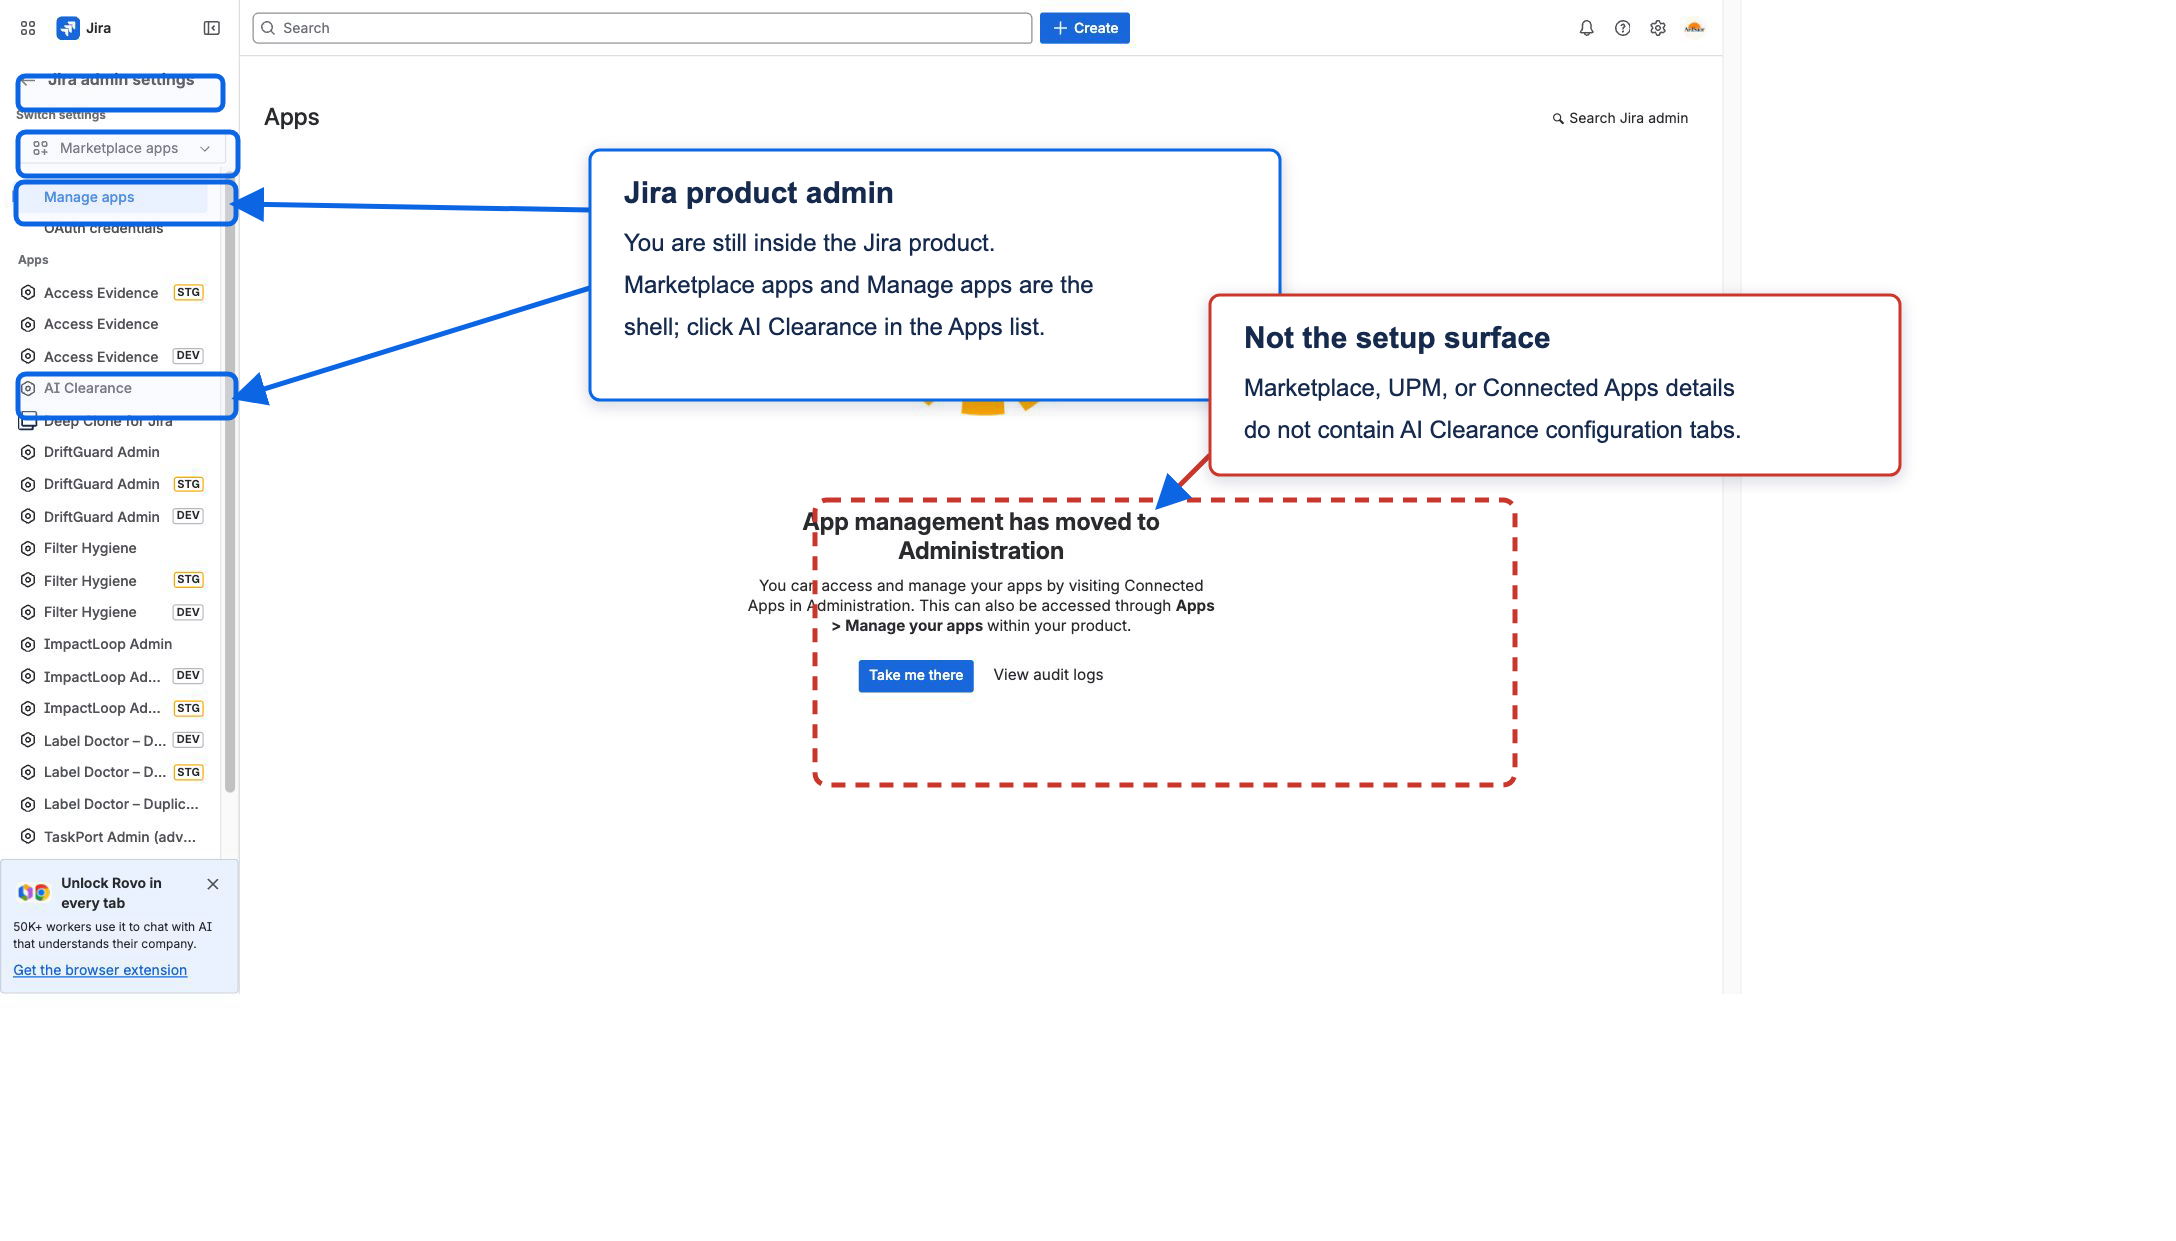
...), then choose Manage apps. - In Jira admin settings, keep Marketplace apps selected in the left switcher and click AI Clearance in the Apps list.
- Open Intake & Approvals, choose the JSM service project, portal, request type, approvers, escalation targets, and expiry-review settings.
- Open Catalog and approve or seed at least one requestable AI tool.
- Submit and approve one portal test request, then open Governance Logs to see the evidence entry.
The first successful run is not just a submitted ticket. It is an approved request with a governance-log record you can show to a client, security reviewer, or auditor.
Marketplace listing, subscription, install, app request, UPM detail, and Atlassian Administration / Connected Apps pages are not the AI Clearance setup surface. Normal first setup is UI-driven; do not start with JSON config, developer configuration, project settings, or Marketplace details unless support specifically asks for them.
Use the AI Clearance setup URL helper if you only have a site name and need Jira home or Manage apps links.
Setup screenshots
https://<site>.atlassian.net/jira.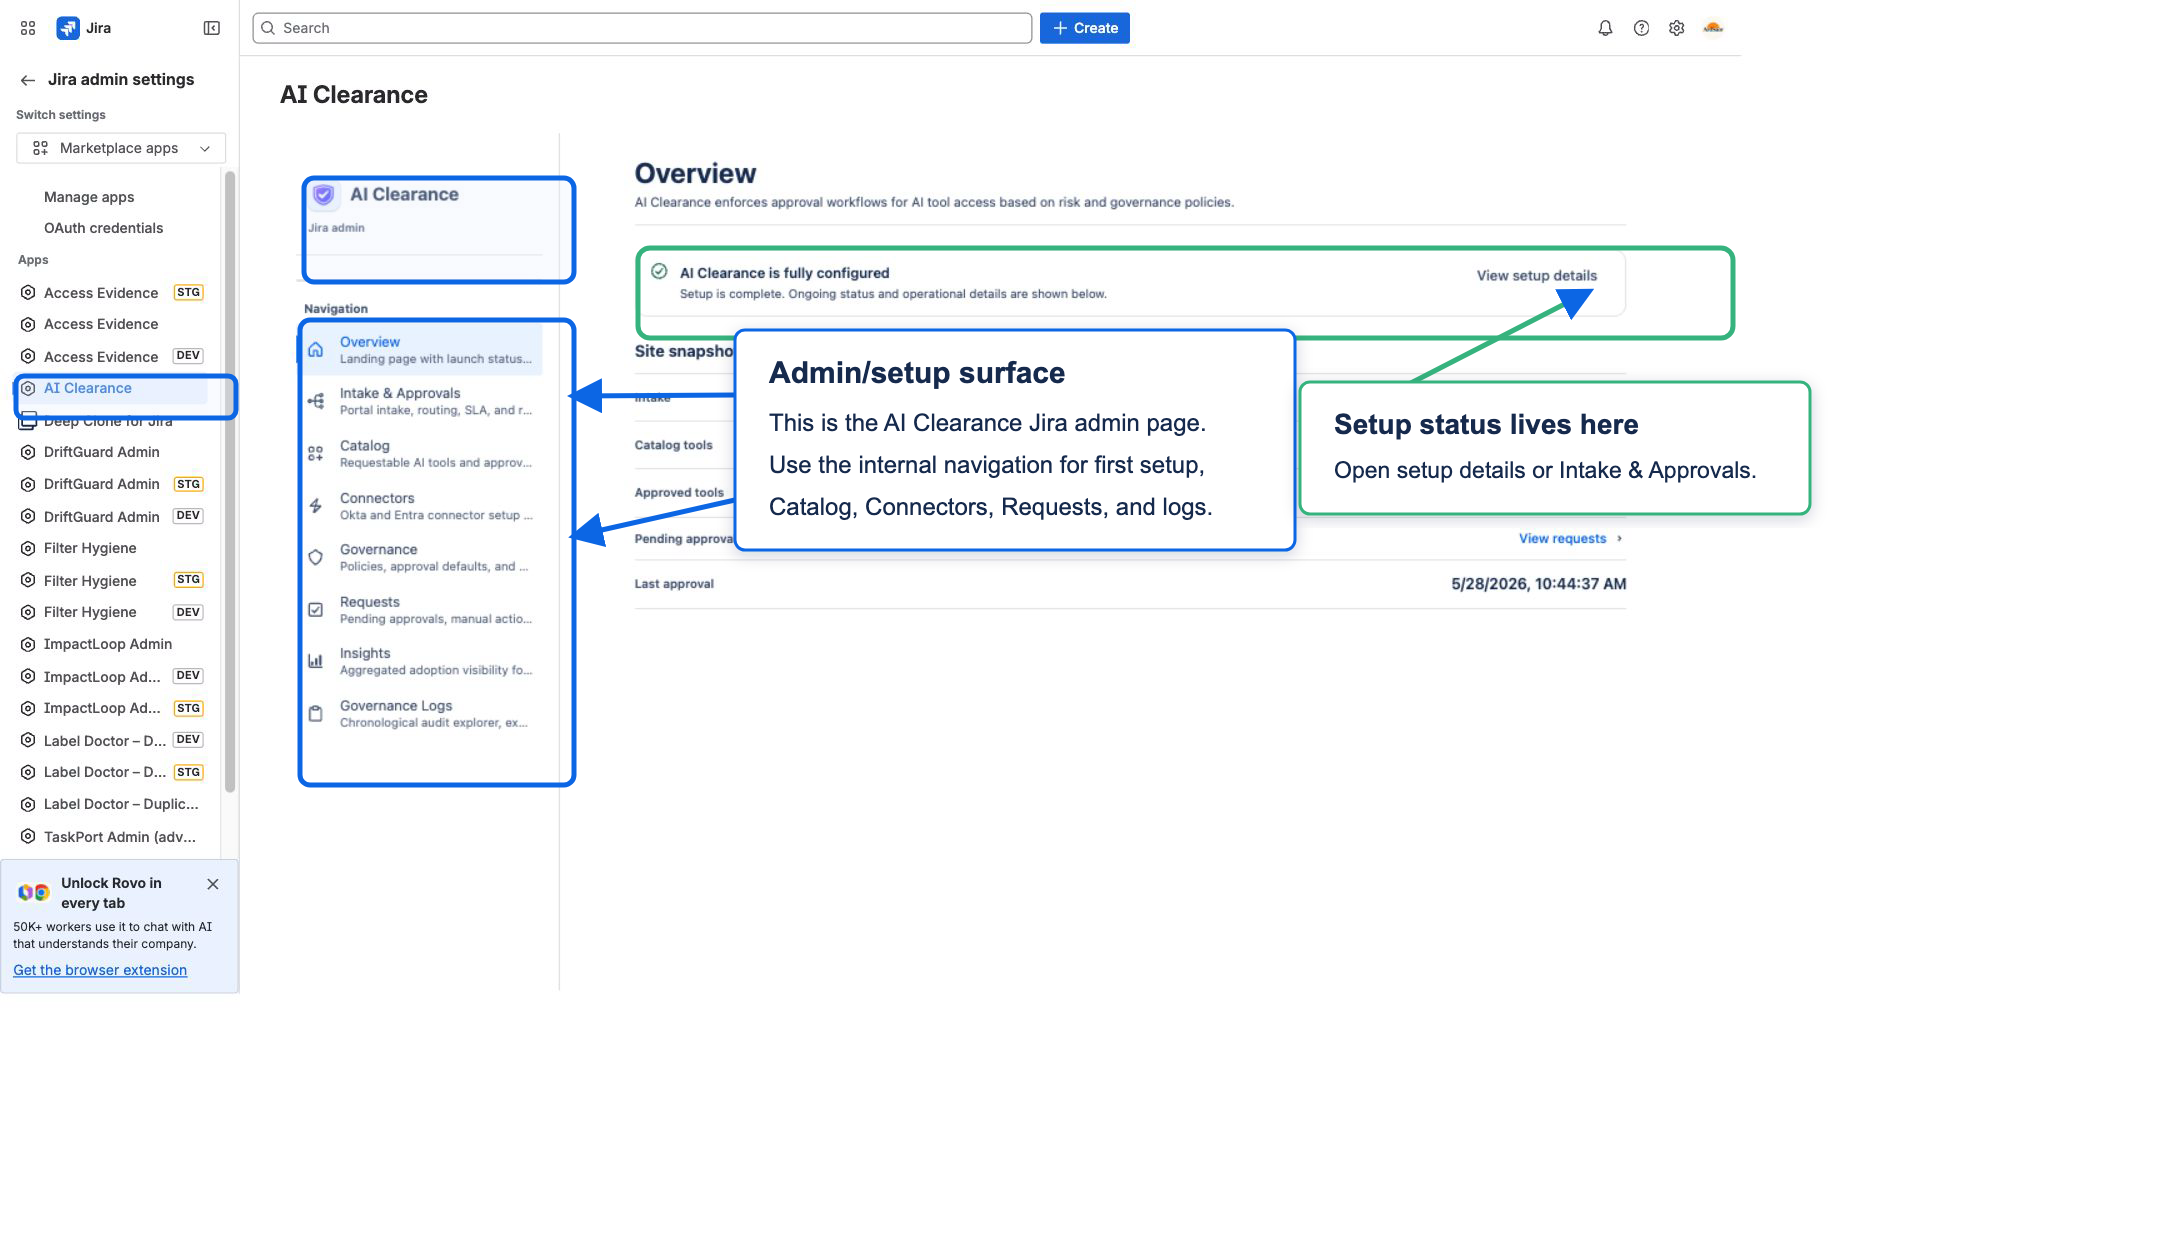
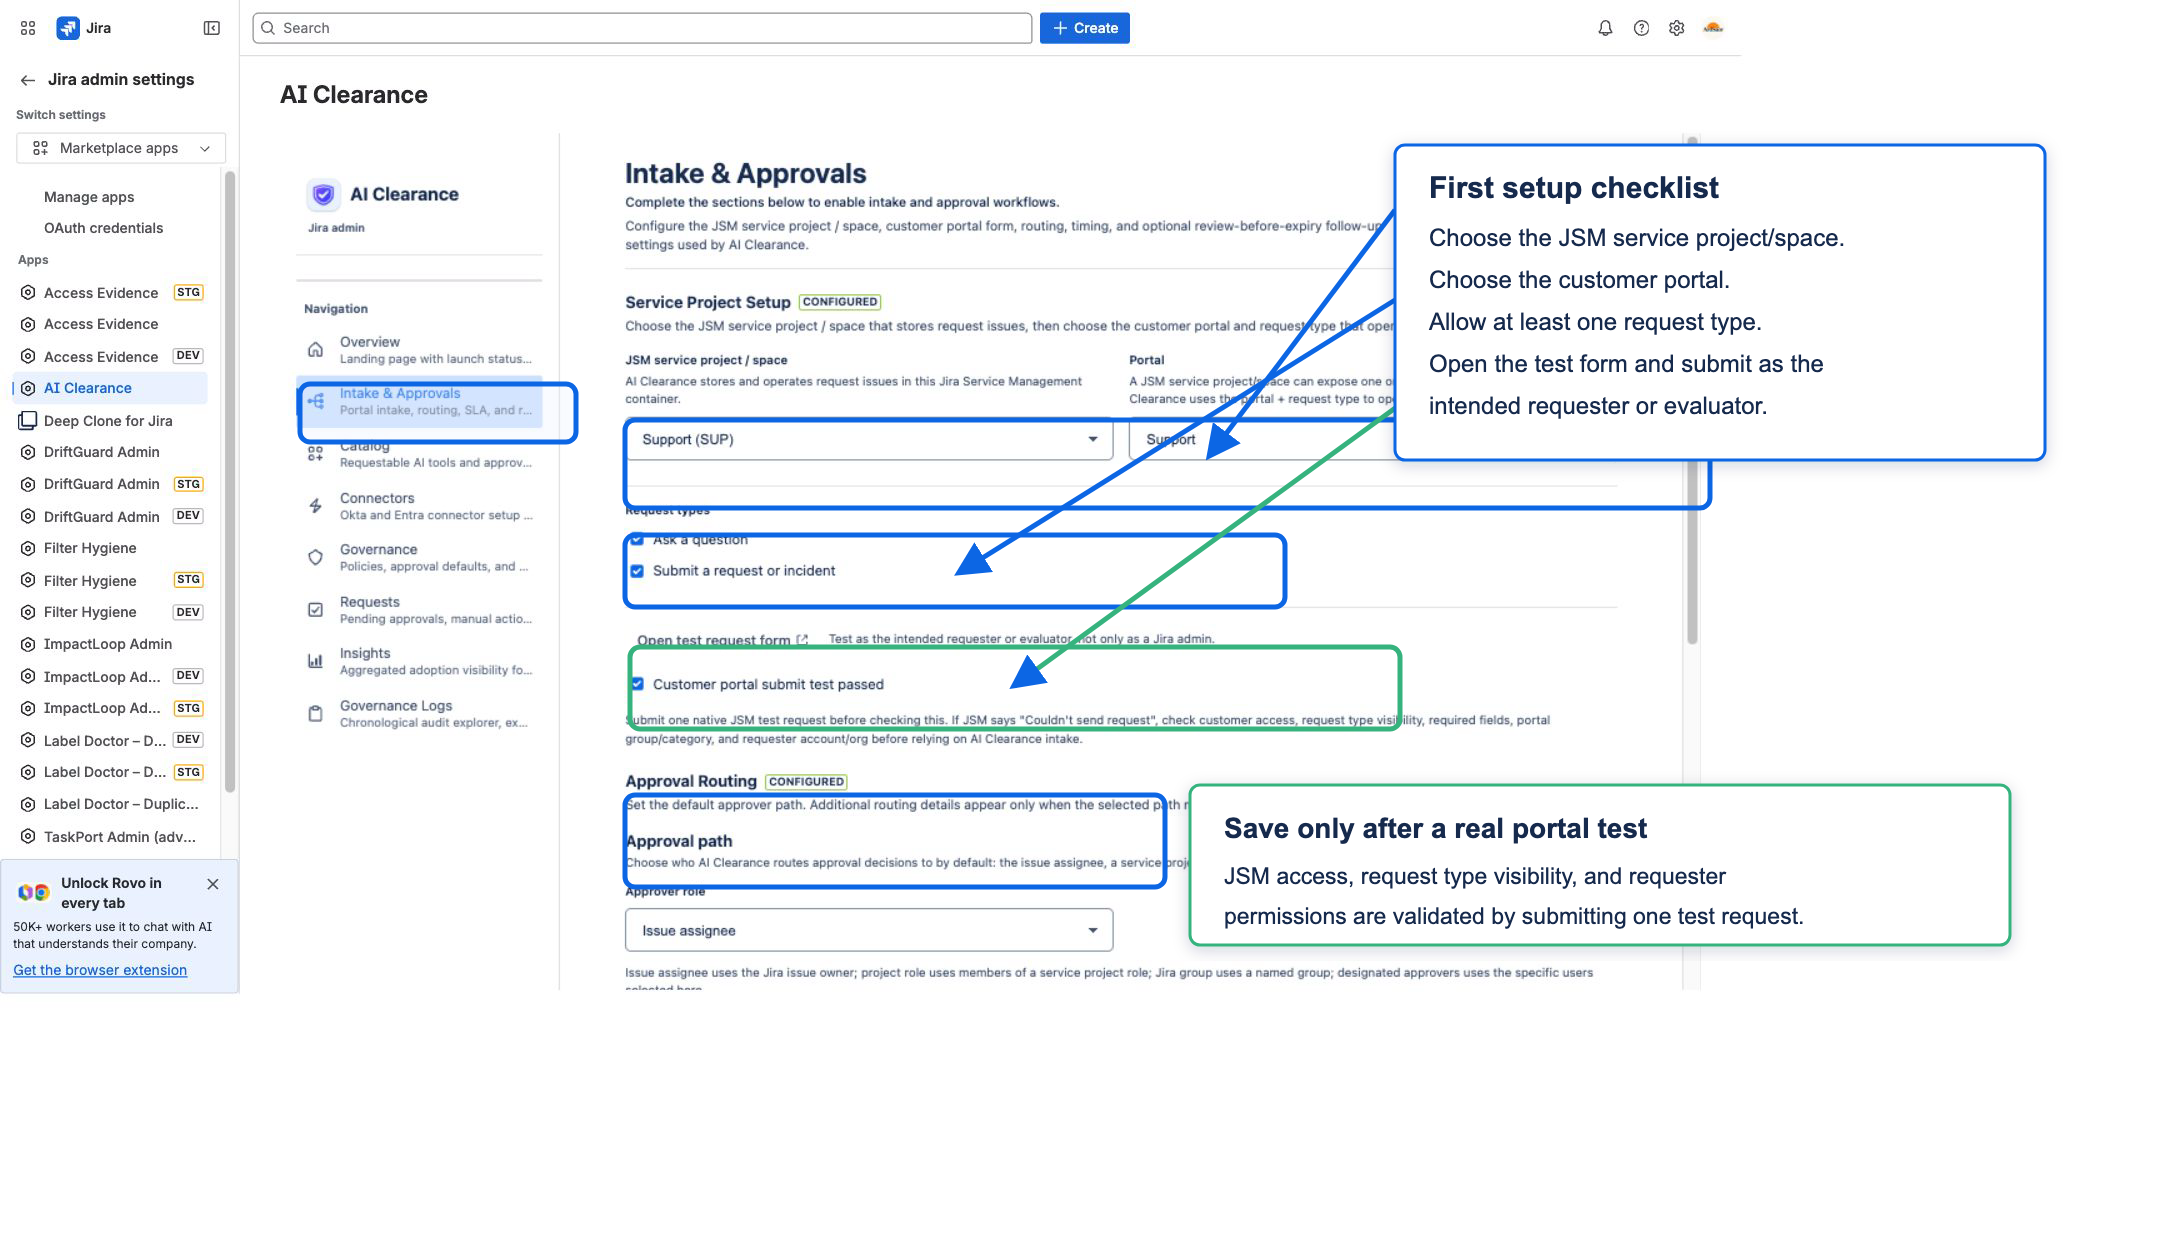
Table of Contents
- Quick Start / After Install
- Setup screenshots
- 1) Product overview and end-to-end flow
- 2) Getting started and prerequisites
- 3) Navigation map (every page/view/state)
- 4) Jira admin control plane
- 5) Global page: AI Clearance
- 6) Admin reporting, requests, and audit logs
- 7) JSM portal and native Jira request surfaces
- 8) Connector setup and operational flows
- 9) Access grant/deny workflows with examples
- 10) Scheduled jobs, automation, and lifecycle events
- 11) Troubleshooting by symptom
- 12) FAQ
- 13) Permissions and data model
- 14) Admin and security considerations
- 15) Support
- 16) Supported tools/models + risk catalog
1) Product overview and end-to-end flow
AI Clearance captures governance metadata for one user's requested access to one approved AI tool for a stated purpose and duration, applies policy-driven approval rules, and tracks the access lifecycle through fulfillment, recertification, expiry, and retention.
Approval surface: approvers work from the Approvals tab inside the global “AI Clearance” page. Use that tab for pending approvals, bulk decisions, and manual provisioning follow-up.
End-to-end flow
- A requester submits the configured JSM portal request.
- AI Clearance captures the request context and marks the request as pending.
- Optional policy checks can auto-approve eligible requests; everything else waits for approver review.
- Approvers approve or deny from the Approvals tab inside the global AI Clearance page.
- Approved requests create a grant and fulfillment follow-up.
- Fulfillment completes through a configured connector or manual confirmation.
- Recertification, expiry, escalation, retention, and Governance Logs maintain the lifecycle evidence.
2) Getting started and prerequisites
Platform prerequisites
- Jira Cloud site with Jira Service Management (for portal modules).
- AI Clearance installed and licensed on the site.
- Jira admin rights for initial site setup and management actions.
Quick launch checklist
- Start from
https://<site>.atlassian.net/jira, notadmin.atlassian.com. - Open Jira settings → Apps → AI Clearance.
- In Intake & Approvals, select the JSM intake project, portal, request types, approvers, escalation targets, and review-before-expiry settings.
- In Catalog, add at least one approved AI tool with risk, default expiry, and optional connector binding.
- In Governance, review risk rules, approval defaults, unknown-tool handling, and exception limits.
- In Connectors, optionally configure Okta or Microsoft Entra configured-group membership actions.
- Submit and approve one portal request, then open Governance Logs to confirm the evidence entry was written.
Connected mode prerequisite (for Okta/Entra group membership)
- Connector support is included in the deployed AI Clearance app for licensed connected-mode sites.
- Customer admins configure connector credentials and identity mappings in AI Clearance; no separate customer-managed integration service is required.
- Active license required; otherwise connector automation stays blocked.
- Each connected catalog tool creates or binds a dedicated configured group. AI Clearance manages membership in that group only; identity-provider or app admins must make that group control the real app, license, role, or resource in Okta, Microsoft Entra, or the target application.
4) Jira admin control plane
Entry: Jira settings → Apps → AI Clearance.
Guardrail: management actions are admin-gated. The app is now site-governance first; there is no separate project-settings happy path in the current release model.
4.1 Overview
- Launch readiness cards for catalog, governance, approval defaults, intake project, portal entry point, and optional connector automation.
- Route actions open the exact section needed to complete setup.
- Summary counters show catalog tools, approvals, connectors, and current readiness state.
4.2 Intake & Approvals
- Select the JSM intake project and portal entry point.
- Restrict allowed portal request types when needed.
- Configure approver routing, fallback behavior, escalation timing, and review-before-expiry issue creation.
4.3 Catalog
Purpose: define governed AI tools and approval metadata.
- Add tool form: display name, provider, status, risk level, default expiry, local guidance, optional connector binding, and entitlement-group metadata.
- Status model: approved tools are requestable; blocked/denied tools are governed but not requestable.
- Catalog seed: administrators can seed common AI tools from the supported tools/models catalog and then customize local policy.
4.4 Connectors
- Supported connected providers:
okta-groupandentra-group; manual fulfillment remains the fallback. - Create, edit, test, enable, disable, or delete provider connectors.
- Connector credentials are stored securely through Atlassian Forge secret storage.
- Identity mappings can match Jira users to provider accounts by email or explicit mapping.
- Connected types require connected mode and valid Okta or Microsoft Entra connector credentials.
4.5 Governance
- Configure risk-level approval requirements, max duration by risk level, security/Jira-admin review rules, unknown-tool blocking, and critical exception limits.
- Approval defaults are versioned so audit history can show which policy version was active at decision time.
- Controlled override and exception flows are tracked for review and expiration.
4.6 Requests
- Review pending, approved, denied, active, historical, and manual follow-up records from one admin surface.
- Apply single or bulk approval/denial actions where permitted.
- Close manual provisioning, deprovisioning, and verification tasks.
- Export request and grant data for operational review.
5) Global page: AI Clearance
Entry: Jira Apps menu → AI Clearance.
5.1 Tab: My Access
- Shows active + pendingProvision grants for current user.
- Expiry labels: expired / expires today / expires tomorrow / N days remaining.
- Highlights expiring-soon and expired grants.
- Extension self-service button is currently disabled by design.
5.2 Tab: Approved Tools
- Lists tools that are available to request under the current governance policy.
- Shows status, expiry defaults, request guidance, and any configured fulfillment notes.
5.3 Tab: Request History
- Shows requester’s prior requests (paginated).
- Decision badges (approved/denied/pending styling).
- Issue key links open Jira issue view directly.
5.4 Conditional tab: Approvals
This tab appears only when the user has approval access in at least one registered project.
- Pending requests table: select rows, single approve/deny, bulk approve/deny.
- Bulk confirmation prompts before applying decisions.
- Manual provisioning actions table: provision/deprovision/check jobs pending human confirmation.
- Manual action completion buttons: Mark fulfilled / Mark deprovisioned / Mark verified.
Operational limits: bulk operations cap at 50 issue keys per request; rate-limited to 5 operations/minute per actor.
6) Admin reporting, requests, and audit logs
Entry: Jira settings → Apps → AI Clearance.
- Requests: pending approvals, request history, grants, manual follow-up, and exports.
- Insights: monthly rollups, adoption, active access, risk mix, people insights, and operational counters.
- Governance Logs: audit event search, detail drawers, chain fields, metadata, and export controls.
- Embedded help: links route administrators to the relevant documentation anchors.
7) JSM portal and native Jira request surfaces
7.1 Request create panel: Select AI tool
Purpose: capture governance metadata before request submission.
Inputs: approved AI tool or “Request new tool”, optional tool URL for new tools, and requested duration.
- The panel appears only for the configured intake portal and allowed request types.
- Submitting attaches the AI Clearance request details to the created Jira issue.
- Request context is later enriched from the native Jira issue summary and description.
- Form is considered valid only when gate is enabled and required fields are complete.
Expected output: the Jira issue keeps the AI Clearance request context needed for approval, fulfillment, and Governance Logs evidence.
7.2 Native Jira request view
- AI Clearance reads the portal request details and Jira request fields.
- AI Clearance can enrich the issue summary/description into a structured access request record.
- Approval, denial, auto-approval, grant, and provisioning events can add issue comments and transition the request where matching workflow transitions exist.
7.3 Portal gating behavior
- Wrong project does not ingest.
- Wrong portal renders no AI Clearance create panel.
- Wrong request type renders no AI Clearance create panel.
8) Connector setup and operational flows
Connector types and behavior
Connected mode is optional. Manual fulfillment remains available when no provider connector is configured. When connected mode is enabled, AI Clearance sends the configured-group add, remove, or check action through ArdSaor Core.
| Type | When to use | What happens |
|---|---|---|
| Manual | Baseline manual fulfillment / no provider group action | The request waits for an approver to confirm completion in the Approvals tab |
| Okta group | Connected provisioning with Okta group membership | Connector setup tests credentials, resolves identities, creates or binds configured per-tool groups, and records add/remove/check membership outcomes after approval |
| Entra group | Configured-group membership for Microsoft Entra | Connector setup tests credentials, resolves identities, creates or binds configured per-tool groups, and records add/remove/check membership outcomes after approval |
Connected mode prerequisites
- The deployed AI Clearance app includes the connected-mode connector modules.
- Connector services are available for the licensed connected-mode site.
- License active.
- A dedicated configured group per connected catalog tool. AI Clearance manages group membership only; identity-provider or app admins must make that group control the real AI app, license, role, or resource in the provider or target application.
Connector data and trust boundary
- Connected-mode requests are authenticated through Atlassian Forge invocation controls and ArdSaor tenant authorization checks before connector actions run.
- Remote payloads can include cloud ID, connector metadata, grant metadata, subject identifiers, external identity, configured group metadata, and optional operational context.
- Connector credentials and external identity secret values are stored through Forge secret storage.
- Upstream remote errors are normalized and sanitized before being surfaced to logs or users.
Fulfillment outcomes
- Success: fulfillment succeeds and an audit event is recorded.
- Retryable failure: AI Clearance retries the connector action before escalating.
- Terminal failure: the connector action needs administrator or support review.
- Manual mode: the request waits until a human confirms completion.
9) Access grant/deny workflows with examples
Example A — Manual approve from Approvals tab
- Select pending request in Approvals tab.
- Click Approve (or bulk approve).
- AI Clearance records the request decision as approved and creates the grant.
- Fulfillment follow-up begins.
- Connected connector: grant becomes active after successful provider action.
- Manual connector: the request waits until an approver marks fulfillment complete.
- Issue transition attempt is made using approve transition names (approve/approved/accept/accepted).
- Audit events recorded: request approved + grant created + provisioning progress.
Example B — Deny request
- Click Deny (single or bulk).
- Decision becomes
denied; no grant is created. - Issue transition attempt uses deny candidates (deny/denied/decline/reject/cancel variants).
- Audit event
request_deniedis recorded.
Example C — Auto-approval policy path
- AI Clearance receives a valid pending request from the JSM portal.
- Policy checks evaluate:
- matching policy by project/tool (or all-tools policy),
autoApprove=true,- group membership match,
- requested duration not above policy max (if configured).
- If all pass: the request is auto-approved, the grant is created, and the Jira issue receives auto-approval evidence.
Example D — Extend or revoke active grant (issue-level management logic)
- Extensions are bounded by total max lifetime (180 days from original grant start).
- Expired grants can only be extended inside a 7-day grace window.
- Revoking starts the deprovisioning follow-up if one is not already active.
10) Scheduled automation and lifecycle events
- Request intake: captures portal request details for approval and evidence.
- Fulfillment automation: processes queued provisioning, deprovisioning, and membership-check follow-up; expires overdue grants; and clears old fulfillment records.
- Approval escalation check: tracks pending approval timers, records SLA breaches or escalations, and adds comments.
- Recertification check: creates recertification issues for grants entering the review window.
- Retention check: prunes old audit events and retained external-identity metadata according to the retention policy.
- Insights refresh: updates daily reporting rollups.
11) Troubleshooting by symptom
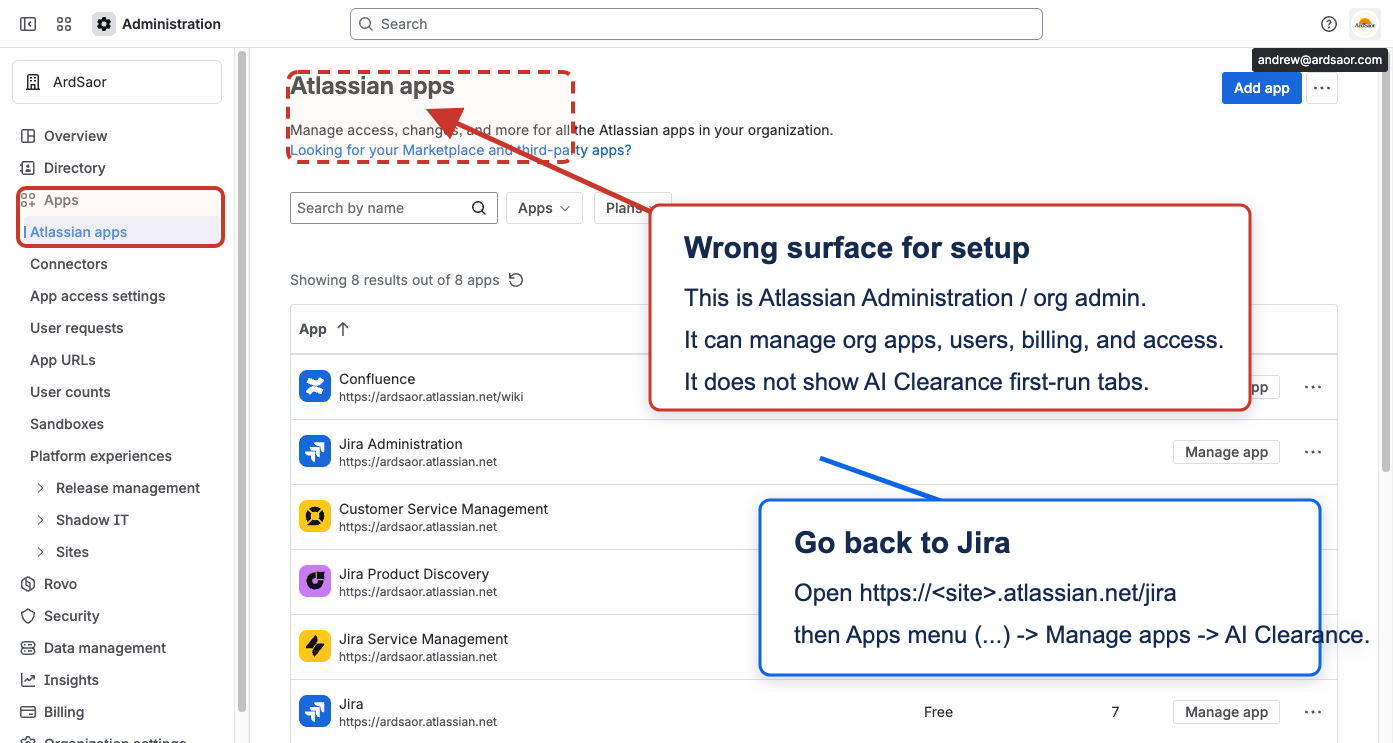
"I am in Atlassian Administration and cannot find setup"
- Atlassian Administration is the org-level admin surface under
admin.atlassian.com. It is useful for organization, user, billing, and connected-app administration, but it is not where AI Clearance first-run setup tabs live. - Open
https://<site>.atlassian.net/jira, then use Apps → Manage apps → Jira admin settings → AI Clearance.
"I only see Marketplace settings or details"
- Marketplace listing, subscription, install, app request, and UPM detail pages do not contain the AI Clearance setup tabs.
- In Jira admin settings, keep Marketplace apps selected in the left switcher, then click AI Clearance under Apps.
"AI Clearance is missing from Apps"
- Confirm you are in the correct Jira site:
https://<site>.atlassian.net/jira. - Confirm AI Clearance is installed and licensed on that Jira/JSM site.
- Confirm your user is a Jira product admin. Org admin alone may not be enough to configure Jira product apps.
- Refresh Jira after installation; Forge app entries can take a short time to appear.
"Portal panel says not enabled"
- Confirm the intake project, portal ID, and request type IDs in Intake & Approvals.
- If using request-type restrictions, ensure correct numeric request type IDs are saved.
"Requests are created but never appear in approvals"
- Confirm the Jira issue contains the AI Clearance request details from the portal.
- Check app logs or contact support for request validation errors.
- Ensure request decision is still
pendingand not already decided.
"Approve/Deny action fails"
- Confirm approver access policy for project (admin fallback or configured approver governance).
- Confirm issue transition/comment permissions are available.
- If bulk action, ensure selected count does not exceed 50.
- If repeated quickly, check for rate-limit errors.
"Connected connector cannot be enabled"
- The site must have an active AI Clearance license.
- Connector services must be available for the licensed connected-mode site.
- The connector must have valid Okta or Microsoft Entra credentials, and the tool must be bound to a configured group that IdP/app admins use to control the real app, license, role, or resource.
"Grant stays pendingProvision"
- For manual connectors, this is expected until a manual completion action is confirmed.
- For connected connectors, review the connector history and support timeline for retry or escalation reasons.
"Auto-approval not triggering"
- Policy must match tool scope and have
autoApprove=true. - Requester must be in at least one allowed Jira group.
- Requested duration must not exceed policy max expiry (if configured).
"Recert issues are not being created"
- Set a valid review-before-expiry issue type ID in Intake & Approvals.
- Confirm grants are active and within recert window.
- Check app logs or contact support for recertification issue creation failures.
12) FAQ
Does AI Clearance support unlicensed portal users?
Yes. The JSM portal request-create panel explicitly allows customer and unlicensed access where Atlassian permits the request form.
Can users self-extend grants from My Access?
Not currently. Self-service extension is intentionally disabled; use approval workflow.
What is the default export date range?
90 days by default, with a maximum allowed window of 365 days per export request.
What if a user already has an active grant for the same tool?
Approval is blocked for duplicate open grants; the workflow returns an explicit conflict error.
How are manual provisioning steps closed?
Approvers complete them from the Approvals tab under “Manual provisioning actions”.
13) Permissions and data model
Forge scopes
manage:jira-configurationread:jira-userread:email-address:jiraread:jira-workwrite:jira-workread:servicedesk-requestwrite:servicedesk-requeststorage:app
Core entities (high level)
- tool, approval-policy, connector, baseline-access
- governed-asset, risk-profile, governance-policy, site-intake-config
- request, access-grant, provisioning-job, audit-event
- external-identity, reconciliation-record, project-registry
14) Admin and security considerations
- Uses Atlassian Forge for app operation and storage.
- Connected mode sends connector requests through ArdSaor Core and then to the configured Okta or Microsoft Entra provider for configured-group membership actions only.
- Connector secrets and external identity values use Forge secret storage references.
- Governance logs include hash-chain integrity metadata (
prevHash/entryHash/entryMac) so exported audit trails can be verified for continuity. - Audit-event retention is currently 365 days unless a tenant-specific support-approved retention policy applies.
- External identity retention follows audit retention unless overridden.
- Sensitive actions (bulk approvals/exports/audit verify) are rate-limited.
- Approval governance supports admin fallback plus role-based and delegated approver routing.
Validation baseline for this page: content is aligned to current AI Clearance admin navigation, portal request flow, connector setup path, and Governance Logs evidence workflow.
15) Support
Need help, rollout guidance, or connector troubleshooting? Contact us via the Marketplace support channel, or via our support inbox. Include your Jira site URL, project key, and a short timeline of what happened.
Related documentation
Product pages provide current positioning and Marketplace links; documentation pages provide operating details.